 Shortly before I moved, I decided to make over my kitchen. It was the last room to do but I kept putting it off for fear I'd have to move as soon and that is exactly what happened. Regardless, it turned out really pretty. Here is the after photo.

This is what it looked like before, very plain. I really hadn't done anything with it. It was functional and that is about it. It was too much work to paint, since I'd have to re-paint it back to white when I moved, so I never did anything to it.
 My first project was to add a kitchen chalkboard. As you may recall, I took a gold mirror I had, removed it, painted the frame white and then painted the back of the mirror with chalkboard paint. That way, if I ever tired of the chalkboard, I could still use it as a mirror.
 Here is the mirror before.

And here it is after. I must say, after using this chalkboard for months, that I absolutely loved it. I use it to write notes for Dad, last minute to do items, inspirational sayings, holiday messages and just about everything. If you are making a chlakboard, I would recommend that you do a large one like this one. Anything smaller or shorter, wouldn't work as well.
 Next to the mirror, I added some decorative plates. I fell in love with this pattern and had purchased a platter off ebay and then located these saucers on ebay for my kitchen. Here is another photo of my completed kitchen; you can see the matching platter over the stove.
 Let's take a closer look. Since it was an apartment kitchen, I was stuck with some ugly things, namely gold hinges on the cabinets, outdated white hardware, old vinyl floors, a wall mounted phone outlet and white appliances from 1995. So my only option was to paint.
 Over the stove, I mounted a platter I had that I liked. To fill the space and to add some interest, I added the words, "Bon Appetit!". I sold my microwave and got a Breville Smart Oven. Actually, my sister was nice enough to purchase it for me since she knew I wanted one. I call my Smart Oven, my Easy Bake Oven because it's so easy to use and the clean up is a breeze. Which would you rather clean, a giant oven or a small, easy bake oven. Plus, the oven cooks great! A close up of the platter.

 I wanted a vintage type feel to the kitchen, so I replaced the white ball hardware with some glass knobs. With concerns over BPA, toxins and just generally trying to be "green", I tried to use all natural materials for my kitchen makeover. For this makeover, I used a vintage platter and saucers (reused), natural materials like glass for the hardware and then woven baskets. I also reused or repurposed my mirror into a chalkboard. Here is the glass knobs that I used.
 I used an antique chandelier that I had and had it rewired into a hanging lamp. That is another way that I stayed "green" so to speak.
 Moving around the room, on top of the refrigerator I used a woven basket. I needed a large one to store Dear Son's feeding bags. This basket stores two weeks of bags.
 On the left side of the kitchen, is where I keep Dear Son's medicine and formula. The basket on the right, stores his formula and the basket on the left, stores his medicines and syringes. I forgot to take a picture of it before I moved. This is one of the few pictures that I had of this.
 I moved into my new apartment so quickly that I didn't realize I didn't have any photos of this side of the room...hence these photos with the oranges, lol.
 Here is the before photo. I relocated all of the bins on top of the cabinets to the laundry room by adding more shelving in there.
 Here is a pretty after photo. You can also see the pretty glass hardware.
 Here is the formula that is stored inside the basket.

 Another view...I just love the colors in this kitchen. The soft green walls, the white roses, the white cabinets and the natural baskets.
 I also wanted a pretty kitchen. Here I used one of the vases that I got a long time ago when I received some birthday roses. I thought it would be pretty to use to hold kitchen utensils. Not only is it pretty, but no one else will have one like it. I also think it's romantic.
 Here is some more detail.
 Here I am in my kitchen...o.k., not really, but I do wear my hair like this a lot in the summer. Also, this is how I'd like to look in my kitchen. You have to admit, the apron is very glam. Photo credit: Haute Hostess Aprons...Glam It Up Luxe Apron.

Let's get cooking shall we. In my kitchen, I try not to use unhealthy pots and pans...no teflon, no aluminum, etc. My pots and pans are stainless steel.

My kitchen even looks pretty when I am cooking. I love the stainless steel with the pretty green paint color. Looks very fresh.
 I used vintage glass relish trays, that I purchased for $.99, as spoon rests. It completes the vintage feel of the kitchen, plus it's made of glass, a healthy kitchen material.
 Aren't they pretty?

 One thing I would love to have is this Kitchen Aid mixer. I love the paint color plus this mixer has the internal gears made of metal, not plastic.

Here is a view of the kitchen looking out into my living room. This is the before photo.

And this is the after photo. I used the lamp for task lighting but I was able to replace the lamp with the chandelier for task lighting. On this side of the room, I had a crystal clock, again keeping with the vintage theme. I also used some vintage glass dishes to store yeast and salt for breadmaking. The white sugar bowl is from my fine bone china set; it's Spode Mansard. I love that pattern as much today as when I purchased it. I also think the glass dishes are more interesting than if I purchased a modern set of three matching bowls/dishes. And definitely, much prettier.
 One project I wasn't able to get done was to replace the faucet. My sister had a polished nickel faucet with crystal knobs that she had purchased for her home but later changed. Once I decided to move, I didn't change the faucet. Next to the sink, is a soap dish. It's new and it's glass. I purchased some vinyl lettering in a script font to add some elegance to the kitchen. Here is a close up.
 A view from the opposite direction.


 One other addition was a polished nickel towel bar to hold my dish drying mat. I use, "The Original Dish Drying Mat". It's a microfiber mat that wicks the water away from your dishes allowing them to dry faster.
 Here is a close up of the polished nickel towel bar.
 To complete my kitchen makeover, I added a monogram to my dust pan. It's the same Edwardian script font that I used for my soap dish and for the "Bon Appetit" lettering. I already had the black and white broom. Who says housework needs to be boring?
 Here it is hanging in my laundry room. I loved seeing the monogram when I opened the door.


And that completes my apartment kitchen makeover...
 Bon Appetit!
 One last look!

Linking to: Delightful Order Inspiring Thursday Party, My Romantic Home Show and Tell Friday, Just a Girl Show and Share Day.


 Originally, I was going to put chalkboard paint over the mirror, after priming it of course, however when I saw the back of the mirror, I decided I could use that instead.
 Also, when I tire of the chalkboard, I can flip it over and still have my mirror. Brilliant. All I needed to do was to remove the glue from the back of the mirror with some liquid adhesive remover like Goo Gone. Once that was done, I could begin painting the back of the mirror. I used Rustoleum Chalkboard paint and brushed it on with a foam roller. Just follow the directions on the can. Also, I tried to make sure that once the paint was on that I went over it again with long strokes in a "W" type pattern so there weren't any roller marks from stopping and starting the paint roller. I let it dry well between coats. I did two full coats.
 Then I decided it had to be white since the gold and silver weren't going to work very well. Initially I thought I could just spray paint the frame however for some reason, it just didn't look right. I did a million light coats but it wasn't covering well. I ended up re-priming it with more white paint and painting it some more however the white seemed more like a blue white than a white-white. Finally, I painted the entire mirror with a foam brush using the wall/trim white paint I used on the kitchen moldings. I did two full coats. Here is a picture of the finished chalkboard. All I need to do is to screw the chalkboard to the frame.


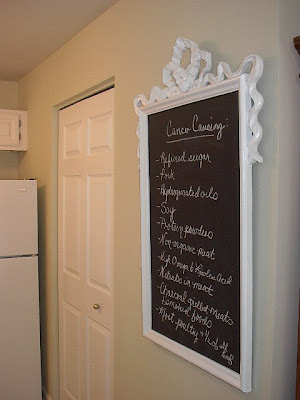 How about the lunch menu instead? That's the beauty of the chalkboard. Will we ever get tired of these? Actually, the chalkboard isn't quite accurate...I am trying a new recipe today-Cheese and Spinach Calzones. I made my own dough and will be baking them in my new Breville Smart Oven, which is a combination toaster/convection oven compliments of my younger sister. I just love it. As for the calzones, Dad's stopping by for lunch so I am thinking he'll want some Italian sausage in his.
