
After seeing all of the chalkboard makeover projects, I couldn't resist doing one myself. I am not a typical crafty type person however after thinking about it, I decided that a chalkboard would be perfect in my kitchen. I recently started a little kitchen makeover project on my apartment kitchen (I'll show before and afters in a few weeks when I'm done!) and tried to work with what I had on hand. I prefer traditional, classic style interiors with preferably, a little Louis XV thrown in. I decided to use this gold decorative mirror for my new chalkboard. (Don't worry, I have plenty of mirrors.) Here is a before picture from my former apartment. Apparently, that's one of the few pictures I have of it. Ignore the crooked candle in the photo...sheesh!
I started by taking the back off of the mirror. This little guy was sitting between the drapery panels and looked pretty cute. Of course, when I tried to take his picture, he ran over to stand on top of the mirror. Notice his cute little legs or paws rather. He doesn't really have much for legs. And yes, he's full grown.
 Originally, I was going to put chalkboard paint over the mirror, after priming it of course, however when I saw the back of the mirror, I decided I could use that instead.
 Also, when I tire of the chalkboard, I can flip it over and still have my mirror. Brilliant. All I needed to do was to remove the glue from the back of the mirror with some liquid adhesive remover like Goo Gone. Once that was done, I could begin painting the back of the mirror. I used Rustoleum Chalkboard paint and brushed it on with a foam roller. Just follow the directions on the can. Also, I tried to make sure that once the paint was on that I went over it again with long strokes in a "W" type pattern so there weren't any roller marks from stopping and starting the paint roller. I let it dry well between coats. I did two full coats.
The frame is another story. I contemplated leaving it gold until I got my new Breville Smart Oven in stainless steel.  Then I decided it had to be white since the gold and silver weren't going to work very well. Initially I thought I could just spray paint the frame however for some reason, it just didn't look right. I did a million light coats but it wasn't covering well. I ended up re-priming it with more white paint and painting it some more however the white seemed more like a blue white than a white-white. Finally, I painted the entire mirror with a foam brush using the wall/trim white paint I used on the kitchen moldings. I did two full coats. Here is a picture of the finished chalkboard. All I need to do is to screw the chalkboard to the frame.
Then I decided it had to be white since the gold and silver weren't going to work very well. Initially I thought I could just spray paint the frame however for some reason, it just didn't look right. I did a million light coats but it wasn't covering well. I ended up re-priming it with more white paint and painting it some more however the white seemed more like a blue white than a white-white. Finally, I painted the entire mirror with a foam brush using the wall/trim white paint I used on the kitchen moldings. I did two full coats. Here is a picture of the finished chalkboard. All I need to do is to screw the chalkboard to the frame.
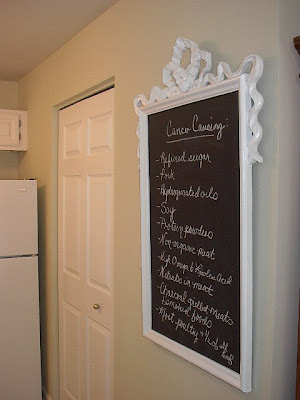
Here is is on the wall.

Another picture...

And finally, after three days of letting the chalkboard paint cure, it's ready to write on. My older sister died of colon cancer last year. She was in her fifties. Maybe the cancer causing foods isn't too cheery for the kitchen, lol.
 How about the lunch menu instead? That's the beauty of the chalkboard. Will we ever get tired of these? Actually, the chalkboard isn't quite accurate...I am trying a new recipe today-Cheese and Spinach Calzones. I made my own dough and will be baking them in my new Breville Smart Oven, which is a combination toaster/convection oven compliments of my younger sister. I just love it. As for the calzones, Dad's stopping by for lunch so I am thinking he'll want some Italian sausage in his.
I hope you enjoyed my new kitchen chalkboard. I'd love to hear from you if you do. Do you have a kitchen chalkboard or are you thinking of making one? I am linking this project to Cindy's Show and Tell Day at My Romantic Home and to Chris at Just a Girl's Show and Share Day. You can check out more great projects there.

18 comments:
I like the gold frame, but I understand the need for change. I think with the chalkboard, the white is better anyway. Love how you saved the mirror and just painted the back of it. How clever!
I would like sausage in my calzone too, please! :) Great job on the frame, and great idea to paint the OTHER side, so you will still have the mirror side. Brilliant! I couldn't have a big chalkboard like this in my kitchen, it is too tiny! Please give your dear son a hug for me. Take care.
Best regards,
Gloria
P.S. You should post this to one of the blogs as a makeover -- how about Susan at betweenmnapsontheporch.blogspot for her Metamorphosis Monday?
gv
I Love it! every home needs a chalkboard!;)
What an adorable idea! Love it!
Right now we're temporarily living out of our RV (recent move). My blackberry phone is my chalkboard (and brain!).
Great idea to keep a grocery list/ menu plan...
great idea & very creative of you! chalkboard is pretty too! thanks for sharing. have a great weekend!
xo
fitty
Looks so wonderful and it was a brilliant idea to keep the mirror!!
Wow great reuse of that gold frame - It looks AMAZING as a chalk board in your kitchen! Thanks for the inspiration!
I love your repurposed chalkboard! It looks so fresh and pretty in white and I love the bow detail at the top. Fantastic job!
Hello! This is just heavenly! I have been dying to do a chalkboard project. Just not enough hours in the day! Yours turned out just beautiful.
Hugs,
Olivia
I love the shape of the frame, and I have a bit of a chalkboard obsession so this automatically steals my heart! :) Great work!
This is a beautiful project! Great frame. I have a frame obsession lately :)
brilliant! love the frame and putting the chalkboard on the back and leaving the mirror part in tact.
Beautiful chalkboard, I love the white frame and you were so smart to paint the back!
We had an old fridge that we painted as a chalkboard. The original paint was starting to flake off, so we sanded down the doors and used chalkboard spray-paint on them. We glued a thin wooden border around both doors, and now everyone wants to draw on our fridge!
i love what you've done,it really looks great!!
i'm sorry to hear about your sister.
have a wonderful week.
Beautiful job! So inspiring~! Would love to still see the list of cancer causing foods, even if its not posted in the kitchen LOL!
Love the makeover! I'm inspired to do one myself.. take care, Maryann ps I like how you painted it white!
Post a Comment