Thursday, October 28, 2010

Happy Halloween~Bed Bug Costume for a Wheelchair Tutorial


Don't Let the Bed Bugs Bite!
I wrote a post earlier in the week on, “Creating Halloween Costumes for Special Needs Kids in Wheelchairs” and thought I should follow up with a little tutorial on how to create a costume. It has been a lot of fun this past week thinking about and creating this costume. Half the joy of it was telling Dear Son about it and talking about how much fun it would be. Dear Son’s eyes would light up and he would smile as I would talk about the project. Part of it is that he loves it when I do things for him. He also loves a party and getting dressed up. View of the entire "Bed Bug Costume".

I originally saw this costume on the Ellen Show however they had a child with a bed hanging around his neck. Attached to the bed was an actual comforter and dust ruffle and the child was not in a wheelchair. I thought it would make a great costume for a wheelchair. I also knew that I could make a cooler bed. For this tutorial, I included a little more detail so you could better understand the creative process involved in the costume. That way, it might make it easier for you to get some other ideas as to what you may want to do for your child. Here are the steps:


1. Sketch it out. Once I’ve decided on a costume, I’ll typically sketch it out. That gives me time to think about the costume a bit and how it might play out. I sketched a box and then thought about how I’d make a quilt. I decided on a patchwork quilt to give it a pop of color. Remember, you want to keep it simple. If you are unsure how to do something, look at a children’s book-they keep the images very simple. So in this case, I did a simple patchwork quilt. I knew Dear Son would be the “bug” part of the costume. Since he’s a teenager and not a young child, I wanted to make his clothes/costume more age appropriate. I decided on a black top, some black leather gloves for his hands and then some antennas (I know those aren’t age appropriate but let’s follow along, lol.) Since he’s a bed bug in a bed, I decided on pajamas for him. Since he’s older, I chose a black, waffle shirt, which looks similar to a long underwear shirt. I used some soft, black and grey plaid flannel pajama pants. It’s soft and casual and normally only something he’d wear around the house, but he’ll wear it for the costume. You could do black sweatpants, but I like the whole bed theme. Next, I thought about what might make the costume better or what would look good with a quilt. I decided to make a top sheet, folded back and then have a message written on it kind of like a sheet that is embroidered. The message on the sheet would be, “Don’t Let the Bed Bugs Bite!” That way, people understand the costume and it’s fun. Also, it gives more color to the costume.

2) Measure the wheelchair for the box. Next, I measured the wheelchair for the box. You’ll want to use the tray for the wheelchair so you can attach your box to it. Be sure to attach the tray to the wheelchair, while the child is in it, then measure for your box. You’ll measure the actual width of the tray and then add another inch on each side so the box will be able to slide over it easily. Next, you want to add the length of the box. This will be the area from the center of the tray, near the child’s abdomen and measure it out past the end of the tray so that the box will cover the child’s knees easily. Finally, you want the height of the box. You’ll measure from the top of the tray down to where you want the box to end. In this case, I wanted a box that measured: 32 W x 36L x 12” D. You can be flexible with all of the measurements except the width. If it’s too big, it will fall off the wheelchair tray and if it’s too small it won’t fit. The length and the depth are more forgiving. Finding the right size box is the hardest part of the project and the most time consuming. Start early. I tried in the past to buy a box at a mailing store (Fed Ex) however at that time, they didn’t have the size I needed. In this case, I couldn’t locate the exact size but a friend was able to locate two boxes and I assumed I would tape them together. You’ll see what I chose below.


3) Figure out the supplies you’ll need. In this case, I’ll need a box, paint, some foam pieces, poster board, markers, a drapery panel and then the usual: scissors, glue, tape measure and ruler. I knew I had some paint on hand, along with the markers and drapery panel. I needed a box, the foam pieces, the antennas and a black shirt. The official list for this project is at the end of the tutorial.

4) Be open to new ideas. For this project, I knew I would get the box, tape it, paint it the background color for the quilt and then paint the top sheet part white. I stopped at Michael’s, the craft store and saw a display cardboard piece that would typically be used for science type projects and decided it would be perfect for my project. The measurements were great as well since it was: 36 W x 48 L x 12 D. In addition, I wouldn’t have to tape the boxes together, paint over the tape which would save me a lot of time. The price was $4.99. (*Note: I should tell you that since this box is intended as a display piece, it folds with the colored part inside; you’ll need to fold it the other way so it sits on the wheelchair like a bed. Not a big deal, but since it’s intended to bend the other way, they have additional cardboard so it’s tough to turn the other way.)
These are the foam pieces I used.

I looked at the foam pieces next and really liked the green and turquoise but nixed the idea. I fell in love with the green and purple but it wasn’t very masculine so I decided to go with Chicago Bears football colors of blue and orange. I selected the blue display board and picked up some foam pieces.
While I was looking, I noticed these foam sports balls (see above photo) so I picked up a package to use for the quilt. Since I wasn’t going to paint the box, I decided to pick up a piece of poster board to use for the sheet. If you had a girl, you could select different colors and some different foam pieces. If your child wasn’t into sports, you could choose some different foam accent pieces.
Photo of black, fuzzy sticks.
Now that I had the basics, I looked for the antennas. I went to a few places but couldn’t find what I was looking for so I decided to make them. I used a black headband and then purchased some black fuzzy sticks (these were known as “pipe cleaners” when I was growing up, lol) for antennas. Originally, I thought I would attached some black felt balls to the end (made with black felt and stuffed with cotton) however when I attached the fuzzy sticks, I realized I didn’t need them. I just took 6 fuzzy sticks, twisted them around the headband and then bent the edges to look like bug antennas. Don’t overanalyze the costume. Just keep it simple.

So in summary, when I went to the store, I nixed the original box along with the idea to paint the box, and nixed the store bought antennas. I added the foam sports balls accent pieces. These changes were key. So the new (official) supply list would look like this:

*Display box from Michael’s.
*1 white poster board.
*3 foam pieces
*1 package foam attachments (I used a sports theme with baseballs, footballs, soccer balls and basketballs.)
*1 drapery panel
*Package of fuzzy sticks.
*Headband
*The craft supplies include: marker to match colors in quilt, scissors, glue sticks, tape measure, ruler, duct tape, chalk.

5) Cut the box to fit over the wheelchair tray. I had Dad help me with this since it the box was so large. I also had him get Dear Son a black shirt for the costume.

6) Cut the poster board to fit the box. The white poster board will be the top sheet on the bed portion of the costumer. The goal is to make it look like the top sheet is folded back over the quilt, like it would in a real bed. Since I didn’t want a seam in the center of the box, I decided to cut the poster board in three parts: one large center piece and two side panels. I made the center piece larger so I could cover up the areas of the arm rests. I made the center panel of the sheet 6 inches tall and 28 inches wide. Each side panel was 6 inches tall and 10 inches wide for a total of 48 inches (28 + 10 + 10=48). At this point, just cut the poster board but don’t glue it to the bed yet.


7) Cut the foam pieces. Lay the foam out and then lay the sport pieces on them. The foam measured 18 inches across so I cut the foam pieces in 6 x 6 inch squares. Cut all the foam and lay out the foam squares on the board. Don’t glue anything yet and don’t cut the bottom pieces of foam.

8) Lay out the foam sports pieces on the board. I tried to make it look random yet I didn’t want any duplicates meaning I didn’t want two baseballs next to each other. You could also customize it more by writing the child’s name on the football.
9) Write the message on the poster board. In this case, I am going to write the phrase, “Don’t Let the Bed Bugs Bite!” on the white poster board. This is supposed to look like it’s embroidery on the sheet. You could have used those squirt type paints (don’t have a clue as to what these are called) and write with the paint. I am not a crafter so just walking into a craft store drives me crazy so I am sure there are plenty of better ideas on how you might do this part but you’ll need to ask a crafter. I used a ruler on the bottom to guide my letters a bit. The poster board was 28 inches across and I had six words in the phrase so I knew each word should take up no more than 4 inches (28 inches /6 words = 4.66 inches per word). If I kept each word at approximately four inches with some space in between, I’d have enough room for the phrase to fit across the top of the sheet. You could also embellish it a bit more and add some rickrack to the sheet, draw rickrack on the sheet or even use the paint to make a border on the sheet.

10) Glue the poster board to the box. Now that you have positioned the white poster board piece to the box, you can use glue it to the box with a glue stick.

11) Glue the foam pieces and then the sports pieces to the board.

12) Measure the foam pieces to the bottom of the box to make the end pieces of the quilt then glue them. I didn’t want to leave the bottom of the quilt empty, so I cut small pieces to fit the end of the quilt.
13) Drapery panel bedskirt. Take a white drapery panel and fold it in half lengthwise. I folded it in half so it would cover his legs and not be so sheer; if you didn’t fold it in half, it would just be sheer and you could see the child’s legs through it. Tape the folded edge to the back of the cardboard with duct tape (see photo above). Next, measure 13 inches from the top of the drapery panel (make sure it’s from the top of the drapery panel and not the top of the duct tape) and make a cut with the scissors. Tear it the rest of the way down (or you can use a scissors and cut the fabric. It’s just easier to tear it. I marked 13 inches all the way across with chalk and then made sure when I tore it, that it tore it along the chalk line, and stayed even.) I tried to make it even with the sides of the box. 14) Antennas-Take 6 fuzzy sticks and twist them around the headband. Then bend the edges. The goal is to make it bug like. You can take a black eye pencil and draw on a nose, moustache and some lines above the eyebrows-anything to make it a little bug like.

The costume is now done. Total cost was: $ 8.87. I am sure Michael’s probably has some fuzzy sticks but I went to another big box store looking for some antennas and when I didn’t find them, I had to go with Plan B and found the fuzzy sticks. My costs were as follows:

1 qty. blue display board-Michael’s……. $4.99
1 qty. white poster board-Michael’s …….$ .59
3 qty. orange foam pieces-Michael’s…….$2.52
1 pkg. black fuzzy sticks-Big Box Store…….$. 77

Making this costume was a lot of fun. Dear Son loves it when we talk about his Halloween costume and seeing it when it’s done. He loves dressing up. Our cat Wiggles also got involved and sat near the supplies and got into the fuzzy sticks, which the cat loves. Dear Son loved the cat getting into trouble (He loves it when anyone gets into trouble-it makes him laugh.) so all in all, it was a great time. It’s also a one of a kind costume for less than $10. Had I taken the time to paint the other boxes, my cost would have been $3.87 since the boxes were free and I had the paint however I decided I liked the paint color of the blue display box so I decided to purchase it and then I didn’t have to put the time and effort into painting the box. For the bed, you could also glue little bugs on the quilt to make it scarier but I was fine with the quilt as is. If you wanted to add the bugs, you could do it several different ways: you could draw them on, glue on black spiders, make bugs out of black felt to glue on, etc. I also saw some clear, plastic balls with spiders inside that would have looked cool glued on the bed, but I decided to keep it simple and skip that. According to pictures on the internet, the actual bed bugs aren’t black but I didn’t feel the need to make this costume “accurate” per se; I just tried to keep it simple and fun. Depending on your child’s abilities and/or developmental skills, this would also be good therapy for them-the cutting skills for occupational therapy, the measuring skills, etc. You could do a little bit every day and have a whole week of fun.

Overall, I think the project turned out great. I hoped you enjoyed our little tutorial. You can find more projects over at Just a Girl Blog for Show and Share Friday.

Happy Halloween!

Sunday, October 24, 2010

Halloween Costumes for Special Needs Children in Wheelchairs

Halloween can be a fun time for kids. There are parties at school as well as going door to door. I always found it to be as much fun for me as it was for Dear Son. For me, it was a time to celebrate him-celebrate him as a little boy plus taking pictures and having all of the wonderful memories to look back on. But Halloween for special needs children can be a little more challenging in terms of a costume. So I thought I’d share some tips that I learned over the years to help your child have the best costume ever! And of course, we are going to make the costumes (no pressure there!). I happen to think that homemade costumes are the best and that is what I want for you and your child. Read along though before you tell me you don’t have the time.

Start early thinking about what your child will be! I typically started pretty early in the year, dreaming up what I’d like Dear Son to be for Halloween. Now it’s a ton easier since we have the internet. Back in the ahem, dark ages, when Dear Son was born, we didn’t have those options. Now you can check out Martha Stewart.com for some great ideas. There are other sites as well. Be sure to check out some costume sites as well but remember, you aren’t ordering, you are just getting “ideas”.


Dear Son as a Chef (5 1/2 years old)

Costumes should be cute or make you laugh! My rule of thumb for all kid’s costumes is that they should be cute or make you laugh. I don’t care for gruesome costumes and I don’t think it sends the right message. Once you have the idea for your costume, you’ll have some time to think it through.


For example, Dear Son was a chef one year. I thought it would be funny to add a moustache to his face however I couldn’t get it to stay on. Finally, I just drew a curly moustache on him and it made the costume. It was perfect since he had lost his front tooth. It’s one of my favorite costumes. This chef costume is the only year where I actually purchased a costume. It was nice but I had more fun the other years when I made them.


Dear Son as the Cat in the Hat (4.5 years old)


Keep it warm! Most of the time, it can be pretty cool on Halloween so I try to choose a costume that is warm. I want to be able to have some warmth under the costume, whether it’s a t-shirt and turtleneck or something like that. It helps if you have some gloves for the costume since it keeps their hands warm. When Dear Son was the Cat in the Hat, he wore a turtleneck, a tall wool hat and white gloves to keep his hands warm.

Dear Son as the Tin Man, 8 1/2 years old.

Skip the masks and use face paint or makeup instead! I can’t speak for all special needs kids but Dear Son never liked anything on his face. Also, if your child has limited abilities, it might be challenging for them to move or remove the face mask. As a result, I never choose costumes with masks. For the tin man costume, I used silver face paint. The picture quality has declined a bit over the years however the face paint was much better than it appears in the photo.
Dear Son as a Scarecrow, 3 1/2 years old.

Make the costume! I’ve made nearly all of Dear Son’s costumes. I also like to give myself a challenge so I often would try to make them for $5.00 or less. Yes, it’s a challenge but most of the time, I had everything I needed if I just thought about it a bit. I remembered back to when I was a kid and the best costumes were always home made and were always made with what we had on hand.

In the scarecrow costume, I spent $5.00 on the mop head from Target. I cut bangs from the mop and used the bangs that I cut and attached them to velcro and put it around his wrist. I used a flannel shirt he had, along with some jeans to complete the outfit. I drew on his nose with a red colored lipstick and added a few freckles. The jeans and flannel shirt helped keep him warm and the yarn was soft so it wouldn't hurt or scratch him like straw would. As this age, he could sit in a high back chair but still used a wheelchair for transport since he couldn't walk.


For the tin man costume, I used a pair of gray, cotton pajamas underneath his aluminum foil. I had aluminum foil on hand and just purchased the silver make up. Total cost again was under $5.00.

Fit the costume to the child and to his disabilities! This sounds odd but really isn’t. We are not trying to accent the child’s disabilities but rather celebrate our child. Use the disability to make your child stand out in his costume. For example, when Dear Son was in elementary school, they did a Christmas play. I came to school for the afternoon Christmas plays and they had each classroom put on their little play/musical. Dear Son’s classroom however had the children with the most disabilities. There were kids who couldn’t hear, kids who couldn’t stand, kids who couldn’t walk, kids who had no use of their hands and arms. I wondered what his teacher was going to do! After all, what did she have to work with? That’s what I was thinking and I think it’s o.k. to be honest with you about that. They closed the drapes to prepare for this skit and the drapes were closed for some ten minutes it seemed as they played a million songs while they set up the stage. When they opened the drapes, the setting just brought tears to my eyes. It was Santa’s Workshop. All the children had on red or green turtlenecks. The child who jumped up and down all the time who couldn’t stand still was a “Jack in the Box”. He jumped up and down and didn’t stop. (Of course, they had an adult standing near the end of thhs stage so he didn’t fall off, lol.). The child that couldn’t keep her head still, was this beautiful doll. Her head rocked from side to side. Dear Son sat in his wheelchair as Santa (I learned later it was because he was the only child who had a red sweater.). My point is that the disabilities didn’t make the children stand it, their disabilities “enhanced” them.

People weren’t crying and applauding feeling sorry for them, they were applauding and crying because these children were beautiful. This teacher managed to show the beauty in each of these children. These children didn’t have disabilities that day, these children were simply children. That’s what we are trying to do for a costume.

In Dear Son's costume as the Jack in the Box, you can see how his inability to sit up straight only enhances the costume. Again, the costume was only a few dollars: paint for the box and a few pieces of foam to use for the blocks and headgear.

In addition, when I say “fit the costume” to the child, there are some costumes that won’t really work, or at least didn't work for my son. For example, Dear Son was very floppy as a baby and as a child meaning he didn’t have much tone. Costumes like a nutcracker or Little Drummer Boy wouldn’t have work because they are standing up straight or have more tone. Instead, if you have a child without tone, who can’t walk and scoots on the floor, make them a caterpillar. Get the biggest piece of faux fur you can and attach it to them, add some antennas and you have it.


Use the child’s wheelchair and tray as part of the costume! This is huge and so much fun! I didn’t think of this until Dear Son was getting much older. It wasn’t really until the Jack in the Box costume that I made where I really started getting the fact that I could use the wheelchair to help me out. In this photo, you can see how I fitted the box over the wheelchair and used the tray to stabalize the box.

Now then, now that you are going to use the child’s wheelchair as part of the costume, your world of possibilities will open up and it will definitely be more fun! Some examples of how you might use the wheelchair are:

Without a wheelchair: Fireman
With a wheelchair: Fireman in a Fire Truck!
Without a wheelchair: Princess
With a wheelchair: Princess in a castle!
Without a wheelchair: Astronaut
With a wheelchair: Astronaut in a Space Ship!
Without a wheelchair: Pirate
With a wheelchair: Pirate on a ship!
Without a wheelchair: Army Guy
With a wheelchair: Army Guy in a Jeep (For this one, I'd take a picture near the wooded area so the background would enhance the costume.)
Now tell me, would that not be too cool! I am excited already!
Embellish the details! With time on your side, you have time to think about the details a bit and embellish them. I try to exaggerate the details to make them stand out and to make it more fun.
So let’s use the example of a fireman in a fire truck. I’d paint the box a bright red. You could use spray paint or a foam roller. Paint multiple coats and allow it to dry well. You want the color to be very bright. Next, I like to use the foam sheets from Michael’s. I am not a crafter so I don’t know where else you can get them but I purchased mine there for around a $1 or so if I remember. I like the foam sheets because they come in bright colors and stand out when you glue them on the boxes. I am less excited about using more paint on the boxes because not only does it take longer but they don’t stand out as much.

Next, I’d think about what might go on fire truck: a ladder, a bell, a siren or a dog (dalmation). Now it doesn’t have to be totally accurate per se. We aren’t going to use these things however we do want it to stand out. Some ideas for a ladder might be a wooden railing from a bed (the flip up kind to keep them from falling out) or perhaps just some dowels purchased at the store and glued on the side for a ladder. You can glue on a bell, a siren (check out the toy store for those). You could also put a dalmation stuffed animal on the top of the fire truck. What little boy wouldn’t love that! Use what you have. When you have a little time on your side, you can go through your house looking for things that you could use as a ladder, a bell, a siren or dalmation. You could even use your son/daughter's communication device and program in a siren sound (provided it doesn't cause them to have seizures, lol) and then they could practice their Occupational Therapy (OT) by trying to hit the button to make the siren sound. How fun would that be? And wouldn't that be a great way to have them practice that in OT prior to Halloween?

For the castle, you can make some faux windows on it, perhaps using some aluminum foil as a window and some yarn or even colored foam for a frame, then add some jewels to the castle for sparkle, etc. It doesn’t have to be historically accurate, it does need to be fun! Check out children’s books for ideas-they typically have cartoon type drawings of castles or whatever and you can get ideas from there.
Keep it simple! As you embellish the box for the wheelchair, keep it simple. On the Jack in the Box costume, you can see I used three colors (red, yellow and blue) and kept the images (blocks) large. Don’t get too detailed. You will also notice in the children's books, the images are very simple as well. Take your clue from them.

Check out Goodwill for props/costume! Goodwill has a surprising amount of costumes for little money. In this case, why not check out Goodwill for a fire hat? By starting early, you have time to look for things you need. Don’t be afraid to ask your brothers/sisters for props for a day or even check out garage sales. Now you don’t have to do any of these things. I am just offering some lost cost ways in a recession to do these things. I always just used what I had at home.

Finish the costume a few days or even a week before Halloween! Be sure to finish the costume early so you have enough time and aren’t rushing at the last minute. It takes a lot of work to take care of a special needs child. You don’t want to short change your child’s needs by working on their costume and then not having the energy to take good care of them.


Take pictures early before Halloween! I wanted great memories and pictures to look back on. I found it much easier to take pictures before the big day. In nearly every case, I took pictures the weekend before or a few days before Halloween. I called it, “Dear Son’s Dress Rehearsal”. The reason is that there is too much pressure to try to get them ready, get yourself ready and then take pictures. This way, you can take your time, enjoy the moments with them taking the pictures and then enjoy the day again on the actual day! For Dear Son’s scarecrow pictures, I took the pictures the weekend before, on a beautiful fall day. We had some good laughs and I have great pictures.


Think about the background for your pictures! For the scarecrow, I took pictures outside since a scarecrow would be outside. For the chef, I took pictures in the kitchen, since a chef would most likely be in the kitchen.
How to enjoy “Trick or Treating” when your child can’t say, “Trick or Treat” or hold the pumpkin/candy container? By now, we’ve made our costume, taken pictures and are ready for the big day. So how can you enjoy Trick or Treating when your child can’t say, “Trick or Treat” or when they can’t hold the pumpkin or bag? It’s easy, but you need to think out of the box and not put so much pressure on yourself. Here’s how I did it:

When Dear Son was young, it felt kind of silly wanting to go Trick or Treating. I wanted to show off his cute costume and yet, he couldn’t eat candy, couldn’t hold the bucket, couldn’t say Trick or Treat, etc. I felt sorry for myself. Back then, when Dear Son was small, he was the only one in our neighborhood of 200 new homes that was in a wheelchair and disabled. I didn’t know of anyone else. I simple decided to get over it and take him out. After all, the reason isn’t to give the kids candy since I can buy that if I wanted to. It’s to celebrate our kids. It’s to see the cute costumes and to laugh. That’s why we take them. It’s as much fun for us as it is for them. Once I started taking him Trick or Treating, it was so much fun. Everyone loved his costumes and he’d get a ton more candy than the other kids and I’d often have to tell them not to since he really couldn’t eat the candy! Then one year, I got it right. I took his communication device and programmed it to say, “Trick or Treat”. I hooked it up to his foot rest since it was easiest for him to use his left foot. As we walked from home to home, he’d start pressing the “Trick or Treat” button with his foot when we got in front of the house and all the way up the driveway. Of course, by that time he was worn out and didn’t always push the “Trick or Treat” button when they opened the door. But we had a ton of fun and we laughed a lot!
Dear Son as an M & M at age 1. This was his first costume. My brother said Dear Son wasn't happy because I made him wear white tights. He said, "No man ever wants to wear tights, no matter how young they are!" I had the neighbor make the costume.

What should I do if I can’t take them out? How can I enjoy Halloween? This is really sad because I know exactly how you feel. There are times when it doesn’t make sense to take them out in the weather or they may have some medical issues going on which aren’t conductive to “Trick or Treating”. In this case, think out of the box. We don’t have to “go” Trick or Treating. Instead, why not take pictures of your child in their costume? Have them printed and send them out to arrive on Halloween? You do this at Christmastime, why not now? Who wouldn’t love to see your little postcard arrive in the mail? Or why not email it? The possibilities are endless.

Other ways to enjoy the holiday is to take advantage of the parties at school. Dress them up in their costumes and send them to school. Dear Son was always the coolest kid; he loved it when I dressed him up and sent him to school in his costume because everyone always commented on that and he loved it!
In the end, Halloween is just another holiday to celebrate our kids. The fact that our children have disabilities doesn’t mean we can’t enjoy the holidays or that they can’t enjoy the holidays only that how we do it may take a little more time, a little more creativity and letting go of the picture perfect ideas that we have in our heads. As the mother of a special needs child, I often just wanted things to be easy. After all, why couldn’t I just do things like other parents? Having a special needs child is a little more work and holidays aren’t any different. But when you open your mind to the possibilities, I’ve found that it can be a lot more fun. I only wish I knew these things when he was younger, instead of having to learn them as I went along but in the end, everything works out as it should. I have some pretty exciting Halloween costumes and some lovely pictures of Dear Son. Oh, how I would love to do this all over again!
On the other hand, they are having a party at school on Friday, and word has it, the teachers and aides do dress up! Maybe I can make another costume???????
Linking to Just a Girl's Blog, Show and Share Day. To see more projects, click here.
Note: Dear Son is eighteen years old and suffers from seizures, dystonia and severe developmental delay as a result of a random mutation of the ARX gene. He also has a progressive neurological disorder and is in the later stages of the disease. He has spent his entire life in a wheelchair.

Thursday, October 21, 2010

Top 10 Qualities of a Great Patient

After listing my, “Top 10 Qualities of a Great Physician”, I couldn’t help but follow up with this list. After almost twenty years of medical visits and hospital visits with a child with complex medical issues, I certainly can’t speak for any physicians, since they would be a better source of what makes a really good patient, however I will share with you my rules on interacting with physicians. As Dear Son’s mother, advocate and caregiver, I’ve developed some systems and some rules that I try to follow to make things go smoother.

1.) Be on time. If you have an appointment, make sure to allow enough time to get to your appointment on time. I try to add in the travel time, parking time, time to get Dear Son’s wheelchair out of the car and get him out of the car plus time to get him ready, myself ready and a little extra time for the last minute emergencies. For Dear Son, an appointment is usually four hours out, meaning I have to start his food four hours in advance of an appointment for him to finish on time (he’s on gtube feedings), plus time to change him, get his medications, etc. No one likes to rush and I don’t like to rush Dear Son. It’s much nicer to take your time and make it a good day. Also, Big Academic Medical Center has limited parking so parking alone can add fifteen to twenty minutes to a visit unless you valet park, however there are long wait times for that as well.

A good rule of thumb is that when you are getting ready, plan for the worst case scenario. Bring lunch or medications for your child so if the physician is running behind, your kids aren’t hungry. I would often pack Dear Son’s lunch and medications and then I could give it to him in the cafeteria of the medical center or in the waiting room if needed since medications can’t always wait. It’s always nicer to have everything with you so your kids don’t have to be hungry and wait until you get home, especially if they can’t eat anything by mouth and rely on tube feedings.

For diaper changes, bring everything you need, including a plastic bag to tie up the diaper. No one wants to smell a dirty diaper in the examining room.

2) Bring a List of Medications/Supplements That You Are Taking. I keep an emergency information sheet for Dear Son that lists all his medications, the name, the strength, the dose, etc. I have this typed up and keep it on hand at all times. For myself, I don’t take any medications but do take some vitamin supplements. Naturally, my list is much shorter. Take the time to make a formal list, and type it up in Microsoft Excel or on your pc if you can, so it’s easier to read. Your visit will go a little faster if you have that information. This saves time since they can just make a copy for their file and you don’t have to sit there and try to remember the name of the prescription, the strength and the dose, especially if the patient is on multiple medications. You should also know the reason that medication was prescribed and by whom.

With regards to electronic medical records, I realize that sometimes this information has already been entered into the system, however that doesn’t mean it’s accurate. Always ask to check the information to make sure it’s accurate.

And finally, in addition to a list of medications/supplements, you need to bring your insurance card to the visit.

3) Write Out Your Questions /Concerns in Advance. I get ready for the visit weeks in advance. I have the date in my calendar and as I think of questions, I simply jot a note in my weekly planner of things to discuss on the visit. Then, when it’s time for the actual visit, I have my questions all ready. The night prior to the visit, I take out my medical notebook, write the date, physician name and time and then write a bulleted list with my questions. This is also a great time to see if you need any prescriptions for any medications you are on. It’s much easier to write them up in an office visit than calling the office and having them call it in. Having your list of questions, saves you time and saves them time. Be respectful of their time. They have a lot of patients to see.

4) Keep it Brief and Professional. View your visit as a business meeting and less as a social visit. Be polite and be professional. Stick to your questions. This isn’t the time to share family photos or to give them all kinds of information. And this should go without saying but always remember that your physician is just that, he or she is your physician. As a result, share only information that is needed for the visit and leave the personal information out. They’ll respect you more if you don’t waste their time.

5) Give Good Information. This can be hard at times. As you prepare for your visit, try to be a little more specific with regards to your symptoms and concerns. For example, let’s say Dear Son is having seizures. Typically, I’ll notice that he’s having more issues or crying out more than normal. I know it’s different however I really need to give the doctor more information than that. Things that will be helpful will be noting the frequency, duration, type and what exactly Dear Son is doing during the seizure. It can be helpful to track them for a few days.

So let’s see how good information would translate in the office visit. Dear Son began having more seizures a while back. I knew he was having more of them however when I started paying attention and tracking them, I noticed that the bulk of them occurred between 1:30-3 p.m. in the afternoon. I also knew that Dear Son received most of his medications in the morning and evening and very little around noon so was most likely crashing. In this case, I called the office in advance, explained the situation and asked if the physician wanted drug levels of the medication. He did. When we arrived at the office visit, I could give him the information in more detail and he could look at the drug levels. As a result, even though his medications were in range, he increased the noon medication. Had I not called in advance, it would still have been fine. He would have just ordered the lab test at the office visit and then would have made the change once he got the information.

A second example might be if you were having back pain. If you have back pain, you’ll want to note the location of your pain (is it down your leg or lower back or where), the type of pain (is it sharp, is it throbbing or is there numbness), and does it go away with medication or rest? Is it worse at any particular time of the day? For pain, you also want to include the intensity of the pain. On a scale of 1 to 10, is your pain a 5, a 7 or a 10? Is it a 10 every day, five hours of the day or what?

For children who are non-verbal, pay attention to their facial expressions. As their mother, you know when pain is not normal and what face represents severe pain. Last November, when Dear Son was released from the hospital, he had severe pain and was screaming for weeks. I kept calling the doctor and he’d make a change, or admit him or add a medication or whatever. Dear Son kept crying. At one point, they thought that he might just cry all the time now. I said no, that Dear Son is in severe pain and that is not like him. I stuck to my guns and it paid off. On the second admission in January, they were able to locate the source of the pain. Be persistent when you know you are right. It’s less about being right but more about taking care of your children so they don’t hurt. Remember, you know your child better than anyone else. The doctors want to find answers as much as you do.

Next, think about the problem and how it affects your daily activities? This is huge. If you have an issue that is affecting your work or home life, meaning you can concentrate or do your work because the pain is so severe, you need to get it addressed. These are examples of the types of information that is helpful for the physician to make a good diagnosis.

And finally, don’t forget to mention any major changes in your life. If the symptoms presented themselves after someone died, or if you’ve have a divorce, job change or any other major life changes, whether positive or negative, you need to mention it. Stress can also affect us and that information would be valuable.
I should also note that if things have changed significantly and you’ll need more time to discuss these issues, you may need to call the doctor’s office in advance, to ask for a longer visit time. Some office visits are scheduled every ten minutes, every fifteen minutes or every forty five minutes. It varies depending on the specialty of the physician and type of visit. First visits are often given longer times. That doesn’t mean you need to take x amount of minutes, just address your questions and move on.

6.) The Internet-I thought it would be important to address the internet here. Many people read a lot of medical or health information on the internet. As you know, not all of it is true however it’s hard to know what to believe sometimes when you don’t have the knowledge base of a physician. From a physician’s standpoint, it can be hard to keep abreast of all of the information out there as well. However prior to an office visit, if there is something that has peaked my interest online, I’ll try to research it a bit more on PubMed and then if it still holds water, ask the physician. What I recommend is that if you have a question, bring a copy of the information with you and ask the physician. Please note, they do not have the time to sort through pages and pages of information you have gathered from the internet. Pick and choose what is important to you and ask them.

7.) Follow instructions.-Once the physician has mapped out a treatment plan, follow it. Take the medication as directed and/or follow up with anything else they have given you. For example, if they have prescribed nebulizer treatments two times a day or whatever, follow through. When you have patients with chronic and complex health conditions, like Dear Son, the physicians will have a lot more respect for you if you take good care of the patient and follow directions.

8.) Use Paging Wisely and Only When Necessary. Physicians are busy people and I try to respect that by paging them only when necessary. My rule of thumb is this…if it’s something the nurse can handle, I’ll call the office and speak with her during normal business hours and if I have a concern for Dear Son, that I think the doctor needs to address immediately, I might call and speak with the doctor. A good rule of thumb is this, if I have to think about whether or not to call the doctor, it probably isn’t an emergency. If I know I have to call the doctor, then it’s probably valid. It’s kind of like calling the fire department. You don’t always have to call them if you smell smoke, however if you have a fire, it’s time to call.

If I have an emergency, I’ll page the doctor and get instructions on what I need to do. For example, if Dear Son is having multiple seizures that are escalating, I’ll page the neurologist and ask him how to proceed. He may ask that I take him to the ER for an admission or he’ll tell me how to treat him at home. I try never to abuse this privilege and I feel it is just that. This goes back to the reason above about being professional. I don’t ever want to be in an emergency situation where the doctor doesn’t take my call because he thinks it isn’t valid or that I am just calling him unnecessarily. Physicians have lives and families too. While it’s true they may have dedicated their lives to helping others, that doesn’t mean that anything goes and they need to be available 24/7.

9.) Medical Errors/Mistakes.-There may come a time when things don’t go as well as you expected or don't go well at all. In these situations, I try to address them privately. In the case I mentioned the other day, where I had issues with the attending specialty doc not visiting in the ICU, I addressed it at an office visit, a few months later. Some things need to be addressed immediately. The bottom line is that I try to treat people as I’d like to be treated and give them an opportunity to respond. Overall, I think I have pretty good relationships with all of his physicians and I can’t think of any time where I’ve had any issues with his primary physicians.

10.) Say Thank You. Physicians give up a lot of time to do their jobs and to take good care of you and your family often at the expense of their family. When they go above and beyond the call of duty, be sure to thank them. Everyone likes to be appreciated and it’s nice when you notice. Just don’t overdo it. You don’t need to send a thank you after every hospitalization, just use good judgment.

In summary, when you have a child with complex medical issues, it can be a lot to deal with over twenty some years. On the flip side, I never keep a physician that I don't like. If I don't personally like a physician, for whatever reason, I'll simply find another doc. There are so many good physicians, who are smart, kind and likeable, that there really isn't any reason to settle for less. And for me, if I have to be in contact with someone for long periods of time, as in the case of Dear Son, I want to make sure it's a person that I like and respect and someone that I feel comfortable addressing any concerns or questions that I may have. I've been very fortunate over the past twenty some years to have a nice group of physicians who have taken great care of Dear Son and myself, so I try to take the time to return the favor.

Tuesday, October 19, 2010

Top 10 Qualities of a Great Physician...A Mother's Perspective


It’s no secret that I spend a lot of time in hospitals. Dear Son has endured some sixty plus hospitalizations and I’ve been there for every one. Over 90% of these hospitalizations have been at a teaching hospital or major academic medical center so I’ve encountered physicians at all stages of their careers. I’ve met residents, fellows and attendings and what is most interesting is that the standout physicians are standouts from the beginning. So let’s imagine for a minute that I am sitting in a patient room at a hospital with Dear Son. Here are my thoughts on what makes a great physician from a mother/caregiver’s perspective.

1) They are always prepared. Much of the work is done before the physician even steps through the hospital door. Good doctors will know three things: the patient’s name and baseline, diagnosis/medical history and finally, what brought him into the hospital this admission. Most attendings do this however many residents don’t.

In a good situation, a doctor will know that Dear Son has a history of seizures from birth, is severely developmentally delayed, is non-verbal, non-ambulatory, on a feeding tube, can’t clear his airways with the risks being seizures, aspiration and respiratory depression and what brought him in this admission.

Residents who are unprepared, rush in the room, don’t read the patient’s medical history, then ask if his appetite is poor now that he’s sick or if he’s weaker than normal and not walking as much. They’ll want a quick update as to how he’s doing so they can update the attending. Their goal is to get the information as soon as possible. They often won’t identify themselves so I am at a loss to know what speciality they are from (Peds, Neurology, GI, etc.) which would help me better frame my answers. I can tell by their questions, asking me if he eating less by mouth, that they’ve never even read the medical history since Dear Son eats nothing by mouth and eats via a gtube. When it’s that obvious, I’ll ask that they take a minute to read the history and then come back and I’ll be glad to answer their questions. Of course, it’s not just one resident that comes in the room, but multiple residents, from multiple shifts, from multiple specialities, and that can all be in just one day.

Being prepared is about respect. I would never dream of walking into a client’s office and meeting with a CIO or anyone in the organization without having done my homework. I would know who they were, the history, their history with my company, customer support issues and as much as I could, as well as reading through their entire contracts so I would not be surprised by anything. Translated, it means being prepared. Now I do understand time constraints in a hospital setting, however if you are involved in the decision making process with patients, you have to take a minute or two to get the basics which include the baseline, medical history and the purpose of the admission. I think residents forget that patients are their clients. Residents shouldn’t demand respect, they should command respect by their actions. Being prepared commands respect.

For Attending Physicians, I most often see this step omitted in new patient histories. For example, sometimes if I make a visit for Dear Son with a new physician, the office will send out a packet to be filled out with the patient’s medical history. It might take three hours or so for me to complete this packet of information and the physician will not even look at it prior to seeing Dear Son. If you ask for information, then read it prior to the office visit, even if it’s five minutes prior to walking in the room. I don’t want to spend three hours assembling information for you and then repeat every detail once I am in the office. If you want to discuss it in the office visit, then don’t send out the packet. My time is important too. I don’t have time to do this twice and I don’t want to spend two hours at an office visit.

2) They always introduce themselves. When meeting someone for the first time, we all value a proper introduction. It’s good to know the other person’s name, their title and a little bit about them. When a person walks into the hospital room, I want to know three things: who they are, their specialty, the purpose for their visit.

A great introduction goes like this: The Fellow walks into the room, standing tall and appears calm and not rushed. He smiles, says hello and asks if it’s Dear Son, introduces himself by saying his name and specialty, then shakes my hand. He asks for my name. He then says a sentence or two letting me know he’s read the patient history, then asks me how he’s doing and asks for information.

A poor introduction goes like this: Resident rushes into the room and wants a quickie update. They look frazzled, are hurried and demand answers, regardless of what you are doing. They ask questions that indicate they haven’t read any patient history and when you ask them if they’ve read it, they get annoyed and still ask the same questions. They waste your time and theirs. The reason a poor introduction is bad is not only because it sets things off on the wrong foot but because it does not allow them to get good information about the patient to make good decisions. If I don’t know who you are, or your specialty, I can’t answer questions well. The worse introductions in my experience are always “pediatric” specialities. They rarely introduce themselves, rarely read the medical history, always appear hurried/rushed and do a lot of unnecessary work. More often than not, they don’t spend their time wisely. This is just my experience at this hospital and certainly does not cover all residents.

The best introductions in my experience over the last twenty years are pediatric neurology fellows. They are smart, cool, calm and collected. They have great manners, are very bright and when you talk to them about their specialty, they just glow.

3) They are good listeners. Having read the medical history, good doctors ask good questions and listen to what is said and what is not said. They read between the lines. They know what information is important to the decision making process and what information is important in caring for the person. A good doctor knows both.

4) They look you in the eyes. I probably wouldn’t mention this had it not been for the electronic records. Electronic records are just that, electronic. Take the time to look at the patient when you are speaking to them. I had one visit where the entire time the Attending Doctor sat with his back to me as he asked the questions, entered the information into the pc, then edited the information in the pc, then re-edited it again. If you want to have a conversation, have a conversation. If I have a situation that is uncomfortable for me to ask you about, I’ll never ask that with your back to me. And that may be the one piece of information you need to make the right diagnosis.

5) They treat everyone well/equally. This is a symbol of class and but something that is so closely aligned with being a great doctor, that I had to mention it. Great doctors are liked by everyone, not just the patient’s, the patient’s mother or by the caregivers. They treat everyone well and I’ll always hear the hospital workers sing their praises as they are cleaning the room or doing whatever task is at hand. When a physician is really good, I’ll hear that from every level of the hospital staff.

6) They allow enough time to address your concerns. The best example of what to do is by talking about what not to do. A poor Attending will come into the patient’s room, say hello, ask how the patient’s doing, get a page, take the page, then say the visit is done and go take the page. I haven’t had a moment to ask any questions and I’ve waited all day to see them. The bill comes in the mail with a charge of $765.00 for that visit.

7) They are good communicators. Good doctors communicate well. They tell you not only what they know, and what to do but what to watch for or what you should be concerned about. In communicating well, they help define the parameters around knowing when it’s an emergency or when to seek medical care. That saves their time and mine.

8) They are kind. There is something about kindness that shows through. You can make a right decision or you can make a right decision for that patient. If you get lucky, they are the same.

9) They always take time to see you when you are in the hospital. This is huge. After all, when you are the sickest, isn’t that the time when you want to see the doctor the most? A good doctor doesn’t always have the time but he always makes the time. That’s the difference. Dear Son has been in the hospital a lot. His medical condition is complex and he’s been in many life threatening situations over the past few years. We’ve spent a lot of time in the ICU, he’s been on ventilators a few times, he’s had a transfusion and we’ve had a few admissions where they didn’t know what was going on. As a result, we’ve had a lot of different physicians that have cared for Dear Son. In times of crisis, it can be challenging as a mother when you hear different physicians talk about what they should do for Dear Son and sometimes I’ll admit that I am not sure who to trust so to speak. It always puts me at ease though when his physician walks in because I know that he knows Dear Son the best and because I know that he’s overseeing or working with the physicians with regards to Dear Son. Sometimes, when you are in a medical crisis, it helps to have a physician that knows the patient very well involved in order to overcome the medical crisis. We have been very fortunate to have a doctor who always makes the time to see us.

On the flip side, we had an incident last year with an attending physician who also happened to be the department head. This particular physician had only seen Dear Son once in the hospital and had let the fellows/residents see him. In this case, Dear Son was seriously ill and it was life threatening. I had many questions and this particular specialty was new to me so I didn’t have much experience in terms of what to expect. It was a stressful time for me. During this time, there was a week where this doctor had never come into see Dear Son or talk to me. At the follow up office visit, I sat down with the doc to address this. I explained the situation in the hospital and said that I would need them to come by more often in the hospital settings since I would have questions and that I would need them to come by more often than once a week. I explained that this was a new specialty to me and that I would have questions and would want to get answers from them versus getting these answers from fellows or residents that did not have their experience. The Attending Physician became very angry and then read me out for about five minutes telling me that they were every busy with clinic and all of the demands and that they didn’t have time to do this. I remained calm and said that was fine, but if that Dear Son didn’t fit into their practice, I would have to find another doctor. I explained that I need a physician the most when Dear Son’s in the hospital, not when he’s in clinic so to speak and that if they don’t have time to see us in the hospital, then they weren’t the right physician for us. Notice, I didn’t say they weren’t a good physician but only that they weren’t the right fit for us. After they went on again, they calmed down and the office visit went fine. It’s not always easy to have these conversations but sometimes you have to have them. I always like to give someone an opportunity to respond to an issue before moving on.

Some months later, we had another crisis and I had to page this Attending Doctor. The Attending was leaving on vacation on a road trip within the hour and couldn’t have been nicer. They addressed the crisis, mapped out a plan, saw us in the hospital and did a great job at our follow up visit. Addressing the situation in clinic made all of the difference. I also made sure to thank them at our follow up visit.

10) They admit it when they make a mistake. This is also important. Everyone makes mistakes and physicians are no exception. It’s o.k. to acknowledge a mistake, apologize and move on. It’s not o.k. to ignore it. Ignoring it sends the message that they don’t care, it wasn’t their fault and the patient isn’t important.

For example, I had a situation where a well liked and well known physician made a medical error that nearly caused Dear Son’s death. It was more than likely a bad judgment call but how they handled the situation was more than disappointing, it was enraging. The mistake occurred and Dear Son nearly died. The doctor came to see Dear Son after the ICU docs and docs involved in Dear Son’s care strongly urged him to see Dear Son. He walked in the room and said Dear Son wasn’t as bad as they said. He got a page, left the room and never said a word. He charged me for the visit. During the hospitalization which lasted several weeks, he refused to see Dear Son. He never came by. I asked to see him now that Dear Son had transitioned to a regular floor and off the ICU floor. He refused to stop by. I spoke with the Peds Attending, whom I knew from the other hospitalizations and explained the situation privately to him and asked him if he could help arrange a visit. The doctor still never showed. We tried to see him for a follow up office visit (while we were still in the hospital) and he still refused to see us.

In the meantime, I went online while I was in the hospital with Dear Son and researched the largest medical malpractice firm in our state. They had only lost one case in their career. I was prepared to call them when I left the hospital. Finally, the Attending Doctor arrived and said he heard that I wanted to speak with him. I explained in very terse terms that I had some concerns I had around the surgical procedure and the fact that I made multiple attempts to see him however his behavior was unacceptable and that I didn’t appreciate that behavior. I said that I wasn’t going to beg to see him and that if he didn’t want to take the time to talk to me that we could talk through our attorneys. It got his attention, he sat down and answered all of my questions. I won’t go into detail however this entire situation could have been avoided had he simply spent five minutes with me in the hospital room in the ICU. I went above and beyond the call of duty to attempt to meet with this physician to discuss this situation and I’ll never do that again. In the future, if they don’t want to meet, I’ll just proceed as I need to. I can accept a bad decision; I can’t accept it when they ignore me. This issue came many years after a previous medical error by a surgical nurse caused over $500,000 in multiple hospitalizations and my son never walked again. Medical errors are serious business.

In summary, I’ve learned a lot about physicians over the years. We’ve been fortunate to have some wonderful physicians that take excellent care of Dear Son. Our Pediatrician did a wonderful job for many years taking care of Dear Son. Our Pediatric Neurologist has done a wonderful job over the past twenty years in caring for Dear Son. I often am at a loss to know how he manages to give such exemplary service over such a long period of time. In the end, it’s not a hospital that makes a facility great, it’s the doctors that make a hospital great. And when you or a loved one are sick, the person you want to see the most will always be “your” doctor, not another Attending, not another Resident, not a Hospitalist or anyone else.

Note: Dear Son is eighteen years old and suffers from seizures, dystonia and severe developmental delay as a result of a random mutation of the ARX gene. He also has a progressive neurological disorder and is in the later stages of the disease.

Thursday, October 07, 2010

Romantic Kitchen Chalkboard Makeover!

After seeing all of the chalkboard makeover projects, I couldn't resist doing one myself. I am not a typical crafty type person however after thinking about it, I decided that a chalkboard would be perfect in my kitchen. I recently started a little kitchen makeover project on my apartment kitchen (I'll show before and afters in a few weeks when I'm done!) and tried to work with what I had on hand. I prefer traditional, classic style interiors with preferably, a little Louis XV thrown in. I decided to use this gold decorative mirror for my new chalkboard. (Don't worry, I have plenty of mirrors.) Here is a before picture from my former apartment. Apparently, that's one of the few pictures I have of it. Ignore the crooked candle in the photo...sheesh!
I started by taking the back off of the mirror. This little guy was sitting between the drapery panels and looked pretty cute. Of course, when I tried to take his picture, he ran over to stand on top of the mirror. Notice his cute little legs or paws rather. He doesn't really have much for legs. And yes, he's full grown.

Originally, I was going to put chalkboard paint over the mirror, after priming it of course, however when I saw the back of the mirror, I decided I could use that instead.
Also, when I tire of the chalkboard, I can flip it over and still have my mirror. Brilliant. All I needed to do was to remove the glue from the back of the mirror with some liquid adhesive remover like Goo Gone. Once that was done, I could begin painting the back of the mirror. I used Rustoleum Chalkboard paint and brushed it on with a foam roller. Just follow the directions on the can. Also, I tried to make sure that once the paint was on that I went over it again with long strokes in a "W" type pattern so there weren't any roller marks from stopping and starting the paint roller. I let it dry well between coats. I did two full coats.
The frame is another story. I contemplated leaving it gold until I got my new Breville Smart Oven in stainless steel. Then I decided it had to be white since the gold and silver weren't going to work very well. Initially I thought I could just spray paint the frame however for some reason, it just didn't look right. I did a million light coats but it wasn't covering well. I ended up re-priming it with more white paint and painting it some more however the white seemed more like a blue white than a white-white. Finally, I painted the entire mirror with a foam brush using the wall/trim white paint I used on the kitchen moldings. I did two full coats. Here is a picture of the finished chalkboard. All I need to do is to screw the chalkboard to the frame.

Here is is on the wall.


Another picture...


And finally, after three days of letting the chalkboard paint cure, it's ready to write on. My older sister died of colon cancer last year. She was in her fifties. Maybe the cancer causing foods isn't too cheery for the kitchen, lol.

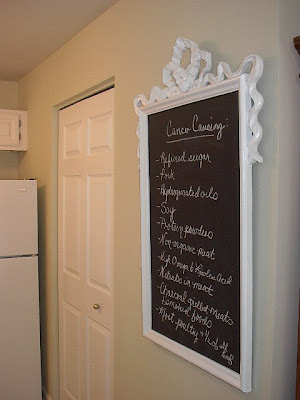
How about the lunch menu instead? That's the beauty of the chalkboard. Will we ever get tired of these? Actually, the chalkboard isn't quite accurate...I am trying a new recipe today-Cheese and Spinach Calzones. I made my own dough and will be baking them in my new Breville Smart Oven, which is a combination toaster/convection oven compliments of my younger sister. I just love it. As for the calzones, Dad's stopping by for lunch so I am thinking he'll want some Italian sausage in his.
I hope you enjoyed my new kitchen chalkboard. I'd love to hear from you if you do. Do you have a kitchen chalkboard or are you thinking of making one? I am linking this project to Cindy's Show and Tell Day at My Romantic Home and to Chris at Just a Girl's Show and Share Day. You can check out more great projects there.
Related Posts Plugin for WordPress, Blogger...

Blog Archive

StatCounter